We’ve once again reached the time of year where everyone is giving gifts for some reason or other. You’ve likely already found yourself caught up in the madness. And whether it’s because you’re too cheap to buy 12 gifts for all of your aunts and uncles, you’re bankrupt, or you just love a good DIY, you’re googling like crazy for the right gift to make. So here we’ve got 3 gifts that are simple, but thoughtful.
Personalized Mugs:
This is a great project to get you through the gift giving frenzy. All you’ll need for this is
- Solid color mugs (Just get however many you plan to make. They can be any color you want, as long as you have a sharpie color that will show up on them).
- Sharpies (These can once again be any color you want).
- An important note about the sharpies: If you use regular sharpies, that’s perfectly fine, however they will not be dishwasher safe. If you want them to last, hand wash them. If you want them to be dishwasher safe, you need to find oil-based sharpies at your local craft store. They’re not super expensive, so don’t worry.
- Your creativity.
Now you can start.
- Decide what you want to draw on these.
- Draw, doodle, and create.
- Once you’ve finished, stick them in the oven to bake for 30 minutes at 350 degrees.
Once they’ve cooled, you’re done. This is super simple, but super fun, and it makes great gift idea. Now on to the next great, easy DIY.
Washi Tape Whiteboard:
This is an awesome project. It’s another low budget craft. This one’s super simple, but you can write and rewrite all sorts of things on it. Here’s what you’ll need.
- Any style roll or rolls of washi tape that you want. (Washi tape is basically another decorative tape. It’s a bit different than duct tape though),
- Picture frame(s). Just a cute, simple frame will work fine. This doesn’t require anything fancy to look awesome. (A one dollar frame from Ikea)
- Plain white paper
- A dry erase marker and pretty much anything to erase it with. (If the dry erase doesn’t work, a sharpie or other marker should. Feel free to try out a few different things).
To actually make this is pretty simple, but when it’s finished, it looks amazing.
- Start by taping strips across the clear glass or plastic bit that goes inside. Just make sure the tape stays uniform across it.
- Wrap extra length around the back.
- Now to cover the back, just trim your sheet of paper so it fits over the back.
- And last, slip it in the frame, and write your message.
Now you have a sweet way to tell friends and family that you appreciate them, or a fun way to keep your scattered thoughts in one place.
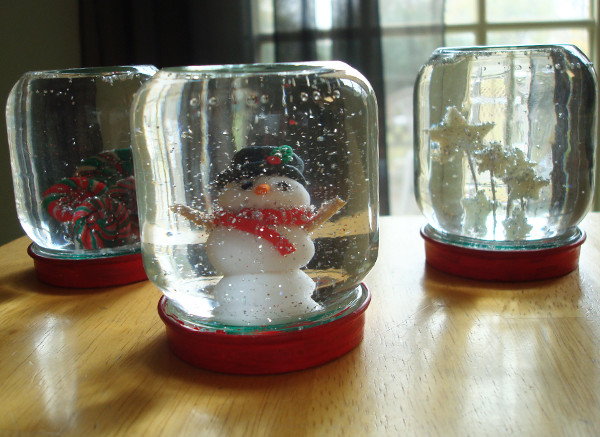
DIY Snow Globe:
This is another simple one, but as a gift I recommend it for the little cousins. Here’s what you’ll need.
- Small glass jars. (Empty baby food jars work, but really any type will do).
- Some little miniature or figure that you’re going to want in your snow globe. (It should be smaller than you think you will need. The water magnifies it).
- Glycerin. (You can find this at a pharmacy. It’s not necessary, but I recommend it as it will help your “snow” float properly).
- Glue. (It can be hot glue, or any other strong craft glue).
- Glitter
- Water
Now go ahead and get started.
- If you use baby food jars, or any other recycled jars, make sure the surface is clean.
- Apply some glue to the bottom of your chosen miniature, as well as to the inside of the lid. Now press the two together and leave them to dry. (Make sure you test the glue before you attach the lid to the jar so you know your figure will stay attached).
- Put about a teaspoon of glitter into the jar. (You can adjust this ratio based on the size of your jar).
- Now add water, as well as 3 to 5 drops of glycerin (if you choose).
- Once you’re sure that the lid is dry, go ahead and screw it on.
- Turn it over, and you have a homemade snowglobe.
Here’s proof of just how much you can do with such a simple, easy project. Go have fun with these creative little pieces. Happy Holidays!


